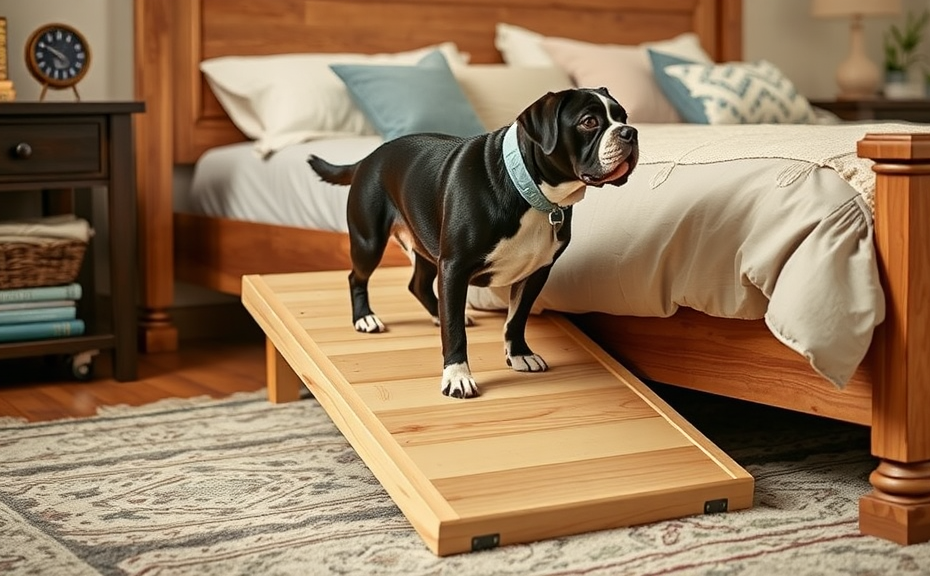
DIY Dog Ramp for Bed: A Practical Solution for Canine Comfort
Enhancing Canine Comfort: A DIY Dog Ramp for Your Bed
As a devoted pet owner, you want to ensure your furry friend’s comfort and well-being, especially when it comes to accessing their favorite spot – your bed. Climbing up and down can be a challenge for some dogs, particularly those with mobility issues or smaller statures. Fortunately, creating a DIY dog ramp for your bed is a practical and cost-effective solution that can make life easier for both you and your canine companion.
Measuring for a Customized Fit
The first step in constructing your DIY dog ramp is to accurately measure the dimensions of your bed. Consider the height from the floor to the top of the mattress, as well as the depth and width of the bed frame. These measurements will guide you in selecting the appropriate materials and designing a ramp that fits seamlessly with your sleeping space.
Selecting the Right Materials
When it comes to materials, you have several options to choose from. Sturdy wood, such as plywood or pine, is a popular choice for its durability and ease of construction. Alternatively, you can opt for pre-made ramps or specialized pet stairs made from various materials like plastic, metal, or even recycled materials. The choice ultimately depends on your personal preference, budget, and the specific needs of your dog.
Building the Ramp
If you decide to build the ramp from scratch, the construction process is relatively straightforward. Start by cutting the wood to the desired length and width, ensuring a gentle incline that your dog can comfortably navigate. Attach side panels or rails to prevent your pup from slipping off the edges, and consider adding non-slip surfaces, such as carpeting or rubber mats, for added traction and safety.
Customizing the Design
Once the basic structure is in place, you can further customize the ramp to suit your dog’s personality and your home’s decor. Incorporate your pet’s favorite colors or patterns into the design, or even add a few personal touches, such as their name or a pawprint motif. This personalization not only makes the ramp visually appealing but also helps your dog feel more at home.
Introducing the Ramp to Your Dog
After completing your DIY dog ramp, it’s essential to introduce it to your furry friend gradually. Encourage your dog to explore the ramp, using treats or praise to make the experience positive. Be patient and allow your pet to become comfortable with the new addition to your sleeping space. With time and positive reinforcement, your dog will likely embrace the ramp as a convenient way to access the bed.
Maintaining the Ramp
To ensure the longevity and safety of your DIY dog ramp, regular maintenance is crucial. Periodically check for any loose screws or wobbly components, and address any issues promptly. Additionally, keep the ramp clean and free of debris to prevent slips or accidents.
Creating a DIY dog ramp for your bed is a thoughtful and practical solution that can greatly enhance your canine companion’s quality of life. By tailoring the ramp to your specific needs and your dog’s preferences, you can provide a comfortable and accessible way for your furry friend to join you on the bed, fostering a stronger bond and making memories together.
Measuring Your Dog’s Needs: Customizing the Perfect Ramp
As a pet owner, ensuring your furry friend’s comfort and safety is of utmost importance. When it comes to providing your dog with easy access to furniture, a DIY dog ramp can be the perfect solution. However, creating a ramp that truly meets your pup’s needs requires careful consideration of their specific measurements and requirements. In this article, we’ll guide you through the process of measuring your dog and designing the ideal customized ramp for their comfort and convenience.
Determining Your Dog’s Dimensions
The first step in creating a tailored dog ramp is to measure your pup’s key dimensions. Start by measuring their height from the floor to the top of their shoulder, commonly referred to as their "withers." This measurement will help you determine the appropriate ramp height. Next, measure the length of your dog’s body from the base of their neck to the base of their tail. This dimension will help you decide on the necessary ramp length.
It’s also important to consider your dog’s weight when selecting the appropriate materials and construction for the ramp. Consult your veterinarian or refer to your dog’s breed information to obtain an accurate weight estimate, as this will ensure the ramp can safely support your pet.
Calculating the Ramp Angle
The angle of the ramp is crucial in providing your dog with easy and comfortable access. As a general rule, the ramp should have an incline of no more than 20 degrees. To calculate the appropriate angle, divide your dog’s height by the desired ramp length. For example, if your dog’s height is 12 inches and you want a 48-inch ramp, the angle would be approximately 14 degrees (12 inches ÷ 48 inches = 0.25, and the inverse tangent of 0.25 is 14 degrees).
Choosing the Right Materials
Once you’ve determined the necessary dimensions, it’s time to select the materials for your DIY dog ramp. Consider using sturdy, yet lightweight materials such as wood or high-density plastic. Ensure that the surface is slip-resistant to provide your dog with secure footing, which can be achieved by adding a textured surface or non-slip covering.
When it comes to the ramp’s construction, you may want to incorporate features like side rails or a gentle curve to provide additional stability and comfort for your canine companion. These design elements can help your dog feel more secure and confident when using the ramp.
Customizing the Ramp
The beauty of a DIY dog ramp is the ability to customize it to your specific needs. Consider adding features that make the ramp more user-friendly, such as a collapsible or foldable design for easy storage and portability. You can also incorporate your dog’s personality by adding fun, decorative elements like paw prints or their favorite colors.
Remember, the goal is to create a ramp that not only meets your dog’s physical needs but also makes them feel comfortable and confident when using it. By taking the time to measure, calculate, and design the perfect ramp, you’ll be providing your furry friend with a safe and accessible way to navigate their favorite spaces.
Designing a DIY dog ramp tailored to your pup’s unique needs is a rewarding and practical project. By carefully measuring your dog’s dimensions, calculating the appropriate angle, and selecting the right materials, you can create a customized solution that ensures their comfort and safety. Remember, every dog is different, so take the time to understand your pet’s specific requirements and incorporate them into your ramp design. With a little creativity and attention to detail, you can build the perfect ramp that will make life easier for both you and your beloved canine companion.
Essential Materials and Tools for Building a DIY Dog Ramp
Building a DIY dog ramp for your bed can be a rewarding project that provides your furry friend with easier access to their favorite napping spot. To get started, you’ll need to gather the essential materials and tools. Let’s dive in and explore what you’ll need to have on hand.
Lumber and Wood
The foundation of your dog ramp will be the lumber and wood. You’ll want to select high-quality, weather-resistant materials like cedar, pressure-treated pine, or exterior-grade plywood. Determine the desired length, width, and height of your ramp, and purchase the appropriate pieces of wood. Remember to account for any necessary supports or bracing.
Non-Slip Surface
Creating a non-slip surface for your dog’s paws is crucial for safety and traction. You can achieve this by using a variety of materials, such as:
- Anti-slip grip tape: This adhesive-backed tape provides excellent traction and can be easily applied to the ramp’s surface.
- Outdoor carpet or artificial turf: These options offer a soft, textured surface that helps prevent slipping.
- Rubber matting: Durable rubber mats designed for outdoor use can provide a non-slip, weatherproof solution.
Fasteners and Connectors
You’ll need a selection of fasteners and connectors to securely assemble your DIY dog ramp. Some essential items include:
- Wood screws: Choose screws that are long enough to penetrate the wood and create a sturdy connection.
- Drill bits: Ensure you have the appropriate drill bits to pre-drill holes for the screws, preventing the wood from splitting.
- Brackets or hinges: These components can help reinforce the ramp’s structure and provide additional stability.
Measuring and Cutting Tools
To ensure a precise and well-fitted ramp, you’ll need a few essential tools for measuring and cutting the wood:
- Measuring tape: Accurately measure the dimensions of your bed and the desired ramp size.
- Circular saw or miter saw: These power tools will allow you to neatly and consistently cut the wood pieces to the correct lengths.
- Pencil or marker: Use these to mark the cutting lines on the wood before sawing.
Safety Gear
Don’t forget to equip yourself with the necessary safety gear to protect yourself during the construction process:
- Safety glasses: Wear these to shield your eyes from any flying debris or wood chips.
- Gloves: Protect your hands from cuts and splinters while handling the wood.
- Hearing protection: Power tools can be noisy, so consider using earplugs or noise-cancelling headphones.
By gathering these essential materials and tools, you’ll be well on your way to building a sturdy and functional DIY dog ramp for your bed. Remember to follow all safety guidelines and take your time to ensure a successful project. Your canine companion will appreciate the easy access and you’ll have the satisfaction of a job well done.
Step-by-Step Guide to Constructing a Sturdy Dog Ramp
Materials and Tools Needed
Constructing a sturdy dog ramp for your bed doesn’t have to be a daunting task. With the right materials and a bit of elbow grease, you can build a functional and aesthetically pleasing ramp that will make it easier for your canine companion to access the bed. Here’s what you’ll need:
- Plywood or other sturdy wood (enough to create a ramp that’s at least 6 inches wide and long enough to reach the height of your bed)
- Wood glue
- Screws or nails
- Sandpaper
- Saw (hand saw or power saw, depending on your preference and skill level)
- Drill
- Measuring tape
- Pencil or marker
Step-by-Step Instructions
Now that you have all the necessary materials and tools, let’s dive into the step-by-step process of building your dog ramp.
1. Measure and Cut the Wood
Start by measuring the height of your bed and the distance from the floor to the bed’s edge. This will determine the length of the ramp you need to construct. Ideally, the ramp should have a gentle incline, so you’ll want it to be long enough to provide a comfortable and easy-to-navigate slope for your dog.
Once you’ve determined the dimensions, use your saw to cut the plywood or wood to the appropriate size. Make sure the width of the ramp is at least 6 inches to provide a stable and secure surface for your dog to walk on.
2. Assemble the Ramp
Lay the wood pieces on a flat surface and apply wood glue to the edges that will be joined together. Carefully align the pieces and secure them with screws or nails. Ensure that the joints are sturdy and the ramp is level.
3. Add Non-Slip Traction
To prevent your dog from slipping on the ramp, you can add a non-slip surface. This can be achieved by applying a textured material, such as outdoor carpet, adhesive-backed anti-slip tape, or even a layer of rubber matting. Ensure that the surface is securely attached and provides good traction for your pet.
4. Smooth and Sand the Edges
Once the ramp is assembled, use sandpaper to smooth out any rough edges or splinters. This will not only make the ramp more comfortable for your dog to use but also prevent any potential injuries.
5. Secure the Ramp in Place
Place the ramp against the bed and ensure it’s stable and secure. You can use adhesive, hooks, or other fasteners to attach the ramp to the bed frame or floor, depending on your preference and the specific setup of your room.
6. Introduce and Train Your Dog
Introduce the ramp to your dog and provide positive reinforcement and encouragement as they learn to use it. You may need to guide them up and down the ramp a few times, using treats or praise, until they become comfortable and confident using it.
With these simple steps, you can create a sturdy and reliable dog ramp for your bed, making it easier for your furry friend to access their favorite sleeping spot. Enjoy watching your dog use the ramp with ease and comfort!
Finishing Touches: Enhancing Safety and Aesthetics of Your DIY Ramp
Enhancing Safety and Aesthetics of Your DIY Dog Ramp
Crafting a DIY dog ramp for your bed can be a rewarding project, but it’s important to consider both the functional and aesthetic aspects to ensure a seamless integration into your home. In this article, we’ll explore the finishing touches that can elevate the safety and visual appeal of your handcrafted ramp.
Prioritizing Safety: Slip-Resistant Surfaces
One of the primary concerns when building a dog ramp is ensuring your furry friend’s safety. To prevent slips and falls, it’s essential to incorporate a slip-resistant surface. You can achieve this by applying a high-traction material, such as outdoor carpet, rubber matting, or anti-slip grip tape, to the ramp’s walking surface. These options not only provide excellent traction but also add a layer of cushioning to your pet’s steps, reducing the risk of injury.
Securing the Ramp: Stable and Sturdy Construction
The structural integrity of your DIY dog ramp is crucial for its long-term functionality and your pet’s safety. Ensure that the ramp is securely attached to your bed or furniture, using heavy-duty hardware and a robust mounting system. This will prevent the ramp from shifting or sliding during use, giving your dog the confidence to navigate the incline with ease.
Enhancing Visibility: Reflective Accents and Illumination
To make your DIY dog ramp more visible, especially in low-light conditions, consider adding reflective accents or integrated lighting. Reflective tape or paint can help your pet (and you) easily identify the ramp’s edges, reducing the risk of missteps. LED lights or motion-activated illumination can also enhance the ramp’s visibility, making it easier for your dog to navigate at night or in dimly lit areas.
Aesthetic Considerations: Personalized Design Elements
While functionality is the primary focus, the aesthetic appeal of your DIY dog ramp can also contribute to its seamless integration into your living space. You can explore various design elements, such as custom paint colors, patterns, or even incorporating decorative elements that complement your home’s decor. These personalized touches can transform the ramp from a utilitarian item into a stylish and intentional part of your interior design.
Maintaining and Cleaning: A Long-Lasting Solution
To ensure the longevity and continued effectiveness of your DIY dog ramp, it’s essential to maintain and clean it regularly. Inspect the hardware, surface materials, and structural integrity periodically, and address any wear or damage promptly. Regularly cleaning the ramp with a pet-friendly cleaning solution can keep it looking its best and prevent the buildup of dirt, hair, or other debris that could compromise its safety and functionality.
By considering these finishing touches, you can create a DIY dog ramp that not only meets your pet’s needs but also enhances the overall safety and aesthetic appeal of your living space. Remember, your dog’s well-being and your own peace of mind should be the guiding principles as you put the final touches on your handcrafted ramp.
Key Takeaway:
DIY Dog Ramp for Bed: A Smart and Customizable Solution for Your Canine Companion
Creating a DIY dog ramp for your bed can be an incredibly practical and rewarding project. Not only does it provide your furry friend with a safe and comfortable way to access their favorite elevated spot, but it also allows you to tailor the ramp to your dog’s unique needs and preferences.
Measuring Your Dog’s Needs: Customizing the Perfect Ramp
The first step in constructing a DIY dog ramp is to accurately measure your canine companion. This includes taking note of their height, weight, and the specific dimensions of your bed. By understanding your dog’s physical characteristics and the environment the ramp will be used in, you can design a solution that perfectly fits their requirements, ensuring maximum safety and comfort.Essential Materials and Tools for Building a DIY Dog Ramp
With the measurements in hand, you can begin gathering the necessary materials and tools to bring your DIY dog ramp to life. Common materials include sturdy wood, non-slip surfaces, and various hardware items like screws and hinges. Having the right tools, such as a saw, drill, and sandpaper, will also be essential for constructing a well-crafted and durable ramp.Step-by-Step Guide to Constructing a Sturdy Dog Ramp
The construction process itself typically involves cutting the wood to size, assembling the frame, attaching the non-slip surface, and ensuring the ramp is securely anchored to the bed or other elevated surface. By following a detailed step-by-step guide, you can ensure that your DIY dog ramp is not only functional but also built to last, providing your canine companion with a reliable and safe way to access their favorite spots.Finishing Touches: Enhancing Safety and Aesthetics of Your DIY Ramp
Once the basic structure is in place, there are several finishing touches you can add to further enhance the safety and appearance of your DIY dog ramp. This may include adding safety rails or barriers to prevent your dog from accidentally falling off the sides, as well as incorporating decorative elements or matching the ramp’s aesthetic to your existing bedroom decor.Creating a DIY dog ramp for your bed is a practical and customizable solution that can greatly improve your canine companion’s quality of life. By taking the time to understand your dog’s needs, gather the right materials and tools, and follow a step-by-step construction process, you can build a sturdy, safe, and visually appealing ramp that will provide your furry friend with the comfort and accessibility they deserve.
Conclusion
Crafting a DIY dog ramp for your beloved canine companion is a rewarding and practical project that can significantly improve their quality of life. By carefully measuring your dog’s needs and using the right materials and tools, you can create a sturdy, customized ramp that provides easy access to the bed, couch, or any other elevated surface. The step-by-step guide outlined in this article ensures a smooth construction process, while the finishing touches like non-slip surfaces and appealing design elements elevate the functionality and aesthetics of your handmade ramp.
Investing the time and effort into building a DIY dog ramp demonstrates your commitment to your pet’s well-being. This thoughtful gesture can make a world of difference for older dogs, those with joint issues, or any canine that struggles with mobility. Not only will your four-legged friend appreciate the newfound convenience, but you’ll also take pride in the practical and personalized solution you’ve created. So, why not embark on this exciting DIY journey and give your beloved dog the gift of comfort and independence? With a little elbow grease and the right guidance, you can easily construct a durable, safe, and stylish dog ramp that will become an indispensable part of your home.