DIY Dog Ramp for Bed: Enhancing Access with Ease
Unleashing Independence: Crafting a DIY Dog Ramp for Your Bed
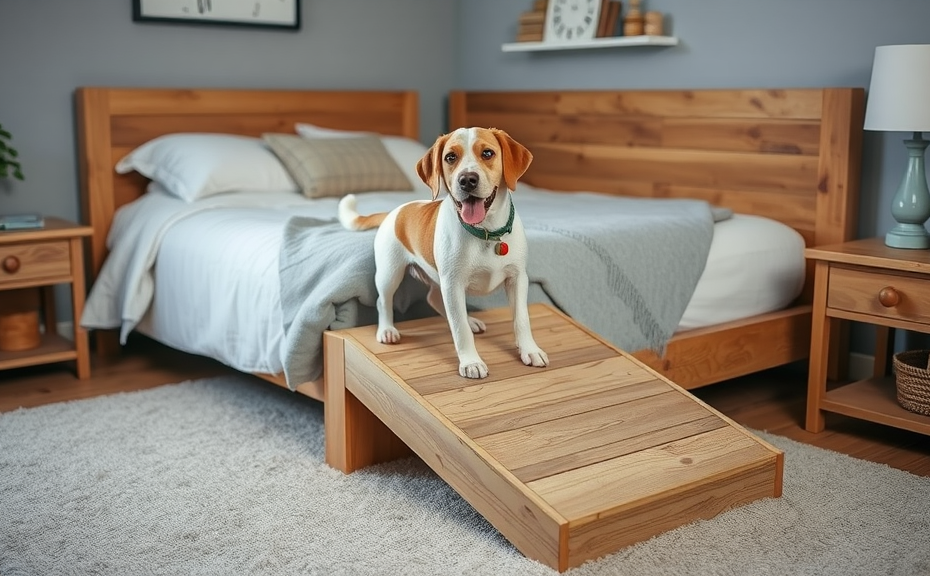
Owning a furry friend comes with countless joys, but sometimes our canine companions face challenges when it comes to accessing their favorite spots, like the cozy comfort of your bed. For senior dogs or those with mobility issues, navigating the height of a bed can be a daunting task. But fear not, crafting a DIY dog ramp for your bed can be a simple and rewarding solution, empowering your beloved pup to enjoy the elevated comfort they deserve.
Measure Twice, Cut Once: Determining the Perfect Fit
The first step in creating your custom dog ramp is to measure the height of your bed. This will ensure that your ramp fits seamlessly, providing a smooth and stable transition for your canine companion. Be mindful of the length as well, considering your dog’s size and the angle required for easy access. With these key measurements in hand, you can begin the design process, tailoring the ramp to your specific needs.
Material Matters: Selecting the Right Components
When it comes to the construction of your DIY dog ramp, the choice of materials is crucial. Opt for sturdy and slip-resistant materials, such as high-quality plywood or weather-resistant wood. This will not only ensure the ramp’s durability but also provide a secure footing for your pup. Additionally, consider adding textured surfaces or non-slip grip tape to the walking platform, enhancing traction and reducing the risk of accidents.
Step-by-Step Assembly: Bringing Your Vision to Life
With the measurements and materials in hand, it’s time to start the assembly process. Depending on your carpentry skills and the complexity of your design, you may choose to follow a set of detailed instructions or create your own unique blueprint. Remember to prioritize safety throughout the construction, ensuring that the ramp is sturdy, stable, and free from any sharp edges or protruding nails.
Customizing for Comfort and Aesthetics
Once the structural framework is in place, you can explore various customization options to enhance the overall look and feel of your DIY dog ramp. Consider adding a decorative trim or painting the ramp to match your bedroom’s decor. You can also incorporate soft, non-slip surfaces, such as carpeting or outdoor-rated foam, to provide extra comfort and traction for your furry friend.
Introducing the Ramp: Acclimating Your Dog
With your masterpiece completed, it’s time to introduce the ramp to your dog. Start by placing the ramp in a familiar and accessible location, allowing your pup to explore and become comfortable with the new addition. Offer treats and praise as your dog becomes accustomed to the ramp, building their confidence and encouraging them to use it with ease.
Maintaining the Ramp: Ensuring Long-Lasting Functionality
To keep your DIY dog ramp in top condition, regular maintenance is crucial. Periodically check for any signs of wear and tear, such as loose screws or damaged surfaces, and make the necessary repairs. Additionally, keep the ramp clean and free of debris, ensuring a safe and comfortable experience for your canine companion.
By crafting a customized DIY dog ramp for your bed, you’re not only enhancing your pup’s independence and accessibility but also demonstrating your unwavering love and dedication. This simple yet impactful project can make a world of difference in your furry friend’s quality of life, allowing them to enjoy the comfort of your bed with ease and confidence.
Choosing the Right Materials for Your Homemade Dog Ramp
Selecting the Right Materials for Your Homemade Dog Ramp
Creating a DIY dog ramp for your bed can be a rewarding and budget-friendly project, but choosing the right materials is crucial for ensuring the ramp’s safety and durability. Whether your canine companion is getting older, recovering from an injury, or simply enjoys easy access to the bed, a well-designed ramp can make all the difference. In this article, we’ll explore the key factors to consider when selecting the perfect materials for your homemade dog ramp.
Strength and Stability
The foundation of a sturdy dog ramp lies in the choice of materials. Look for strong, weight-bearing options that can comfortably support your pet’s size and weight. Plywood, solid wood, or even high-density foam are all excellent choices, as they provide a sturdy base that can withstand the pressure of your dog’s movements.
Slip-Resistant Surface
To prevent your dog from slipping and sliding on the ramp, choosing a material with a non-slip surface is essential. Textured rubber, outdoor carpet, or even a layer of anti-slip grip tape can help create a safe, traction-enhancing surface for your pet to walk on. This added grip can give your dog the confidence to use the ramp without fear of falling.
Lightweight and Portable
Depending on the placement of your dog’s bed, you may need to move the ramp regularly. Opting for lightweight materials, such as aluminum or a combination of wood and plastic, can make the ramp easy to lift and transport. This flexibility allows you to adjust the ramp’s location as needed, ensuring your pet has consistent access to the bed.
Weather-Resistant and Durable
If the ramp will be used outdoors or in a humid environment, it’s crucial to select materials that can withstand the elements. Weather-resistant options, like marine-grade plywood or waterproof fabrics, can prevent the ramp from warping, cracking, or deteriorating over time. This investment in durable materials will ensure your homemade dog ramp lasts for years to come.
Comfort and Cushioning
While structural integrity is essential, don’t forget about your dog’s comfort. Consider adding a soft, padded surface, such as a pet-safe foam or fabric, to make the ramp more inviting and gentle on your pet’s paws. This extra cushioning can be especially beneficial for older dogs or those with joint issues.
Customization and Aesthetics
Your homemade dog ramp doesn’t have to be purely functional; it can also complement your home’s decor. Choose materials and finishes that align with your personal style, whether that’s sleek and modern or rustic and natural. Experimenting with different wood stains, paint colors, or decorative accents can help you create a ramp that not only serves its purpose but also enhances the overall look of your living space.
When selecting the materials for your DIY dog ramp, keep in mind your pet’s needs, your own preferences, and the ramp’s intended location. By carefully considering factors like strength, traction, portability, and aesthetics, you can build a custom ramp that provides your furry friend with safe and convenient access to the bed, while also adding a touch of style to your home. With the right materials and a little bit of creativity, you can create a functional and visually appealing dog ramp that both you and your pet will love.
Step-by-Step Guide to Building a Sturdy Dog Ramp for Bed
Crafting a Sturdy Dog Ramp for Your Bed: A Step-by-Step Guide
Are you tired of lifting your canine companion onto the bed every night? Fear not, for a homemade dog ramp can be the perfect solution to this problem! Not only will it make your pup’s life easier, but it can also add a touch of personalization to your bedroom decor. In this article, we’ll guide you through the process of creating a sturdy and functional dog ramp that will serve your furry friend for years to come.
Choosing the Right Materials
The first step in building your dog ramp is selecting the appropriate materials. You’ll need a few basic supplies, including:
- Plywood or wood boards for the ramp’s base
- Wooden boards or PVC pipes for the ramp’s sides
- Non-slip surface material, such as carpet or anti-slip tape
- Wood glue, screws, and other fasteners
When choosing the materials, consider the size and weight of your dog. The ramp should be able to support their full weight safely, so opt for sturdy wood or high-quality plywood. Additionally, ensure that the dimensions of the ramp are suitable for your bed’s height and your dog’s needs.
Measuring and Cutting the Ramp
Once you have all the necessary materials, it’s time to start the construction process. Begin by measuring the height of your bed and the length needed for your dog to comfortably ascend. The ramp should have a gentle incline, typically around 20-30 degrees, to make it easy for your pup to navigate.
Next, use a saw to cut the plywood or wood boards to the desired length and width. If you’re using wooden boards, you’ll need to cut them to the appropriate size as well. Remember to account for the height of the ramp’s sides when calculating the length.
Assembling the Ramp
Now it’s time to put the ramp together. Start by attaching the side pieces to the base of the ramp, ensuring they are securely in place. You can use wood glue and screws to ensure a sturdy connection.
Once the sides are in place, it’s time to add the non-slip surface. This can be done by cutting a piece of carpet or anti-slip tape to fit the ramp’s base and adhering it with a strong adhesive. This step is crucial, as it will provide your dog with the necessary traction to climb up and down the ramp safely.
Finishing Touches
Before your dog ramp is ready for use, you may want to consider adding a few finishing touches. You can paint or stain the wood to match your bedroom’s decor, or even add decorative elements like paw prints or your dog’s name.
Place the ramp against the bed and test it out. Encourage your dog to use the ramp by placing treats or their favorite toys at the top, and be patient as they get used to this new feature in their lives.
Building a dog ramp for your bed is a rewarding project that can make a significant difference in your furry friend’s daily routine. By following these step-by-step instructions, you can create a customized and functional ramp that will provide your dog with easy access to their favorite sleeping spot. Enjoy the newfound convenience and the happy wagging tails that will come with your DIY dog ramp.
Customizing the Design: Tailoring the Dog Ramp to Your Needs
When it comes to creating a DIY dog ramp for your bed, the design possibilities are endless. The beauty of a homemade ramp is that you can customize it to perfectly fit your dog’s needs and your home’s aesthetic. Whether you’re looking to match your décor or accommodate a specific space, there are numerous ways to tailor the ramp to suit your preferences.
Material Choices for a Personalized Touch
The material you choose for your dog ramp can have a significant impact on its appearance and functionality. Wood is a popular option, as it can be stained or painted to complement your existing furniture and décor. Opt for a smooth, sturdy plywood or hardwood for a sleek, polished look. Alternatively, you could use reclaimed wood for a rustic, farmhouse-inspired design.
If you’re feeling particularly crafty, you can even incorporate decorative elements into the ramp’s construction. For instance, you could add custom-cut shapes, patterns, or your pet’s name to the side panels for a personalized touch. Unleash your creativity and let your dog’s personality shine through in the design.
Dimension Adjustments for a Seamless Fit
The dimensions of your dog ramp are crucial for ensuring a safe and comfortable climb for your furry friend. Begin by measuring the height of your bed and the distance from the floor to the mattress. This will help you determine the appropriate length and incline of the ramp, ensuring your dog can access the bed with ease.
Tip: Aim for a ramp incline of no more than 25 degrees for optimal stability and ease of use.
Once you have the basic measurements, you can fine-tune the ramp’s width to accommodate your dog’s size. A wider ramp provides a more stable and secure surface for larger breeds, while a narrower design may be better suited for smaller dogs. Don’t be afraid to experiment with the dimensions until you find the perfect fit.
Integrated Storage Solutions
If space is limited in your home, consider incorporating storage features into your dog ramp design. You could add shelves or drawers to the sides or underneath the ramp, providing a convenient spot to stash your pet’s toys, treats, or other accessories. This not only maximizes the functionality of the ramp but also helps to keep your living space organized and clutter-free.
Aesthetic Enhancements
Beyond the practical considerations, you can also explore ways to enhance the visual appeal of your DIY dog ramp. Incorporate decorative elements, such as carved patterns, contrasting trim, or even a built-in nightlight, to make the ramp a true focal point in your bedroom. The possibilities are endless, and your imagination is the only limit.
Safety Considerations
While customizing the design, it’s important to prioritize your dog’s safety. Ensure that the ramp’s surface is slip-resistant, either through the use of textured materials or the addition of non-slip treads. Additionally, consider adding side rails or guards to prevent your furry friend from accidentally falling off the edges during the climb.
Prototype and Test
Before finalizing your DIY dog ramp, it’s always a good idea to create a prototype and test it out. This allows you to make any necessary adjustments to the design, materials, or dimensions to ensure a seamless and secure experience for your pet. Don’t be afraid to experiment and refine the ramp until it’s perfect.
Customizing a DIY dog ramp for your bed is an opportunity to showcase your creativity while prioritizing your pet’s comfort and safety. By considering the material choices, dimensions, storage solutions, and aesthetic enhancements, you can craft a one-of-a-kind piece that perfectly complements your home and your furry companion’s needs.
Ensuring Safety and Stability: Testing and Maintaining Your DIY Dog Ramp
Safety First: Ensuring a Secure and Stable DIY Dog Ramp
When it comes to providing your furry friend easy access to their favorite spots, a DIY dog ramp can be a fantastic solution. However, ensuring the safety and stability of your homemade creation is of utmost importance. In this article, we’ll guide you through the critical steps to test and maintain your DIY dog ramp, so you can confidently provide your canine companion with a reliable and secure way to get around.
Assessing the Structural Integrity
The foundation of a reliable DIY dog ramp is its structural integrity. Before allowing your dog to use the ramp, it’s crucial to thoroughly inspect it for any signs of weakness or instability. Start by examining the materials used in the construction. Ensure that the wood, screws, and any other components are of high quality and can support the weight of your dog.
Next, check the overall stability of the ramp by applying your own weight to it. Step on it, rock it back and forth, and make any necessary adjustments to ensure it doesn’t wobble or flex excessively. Remember, your dog’s safety should be your top priority, so don’t hesitate to reinforce or rebuild the ramp if you have any doubts about its structural integrity.
Testing the Surface Traction
The surface of your DIY dog ramp should provide ample traction to prevent your dog from slipping or losing their footing. A smooth or slippery surface can be incredibly dangerous, especially for older dogs or those with mobility issues.
To test the ramp’s surface traction, try walking on it yourself, both with and without shoes. If it feels slippery, consider adding a non-slip material, such as anti-slip tape or a rubber mat, to enhance the grip. You can also experiment with different types of surfaces, such as textured wood or non-slip paint, to find the best solution for your dog’s needs.
Evaluating the Incline and Dimensions
The incline and dimensions of your DIY dog ramp play a crucial role in its safety and usability. The ramp should have a gentle slope that allows your dog to comfortably and confidently navigate it, without feeling like they’re climbing a steep hill.
Measure the height of the surface the ramp is intended to reach and use that information to calculate the appropriate length and incline. As a general guideline, the ramp should have a slope of no more than 20 degrees, with a length that allows for a smooth and easy ascent or descent.
Additionally, ensure that the ramp’s width accommodates your dog’s size and allows them to move freely without feeling confined. A ramp that is too narrow can be just as dangerous as one that is too steep.
Ongoing Maintenance and Adjustments
Maintaining the safety and stability of your DIY dog ramp doesn’t end with the initial testing and setup. Regularly inspect the ramp for any signs of wear, damage, or changes in its structural integrity. Check for loose screws, cracks, or other issues that could compromise its stability.
If you notice any problems, address them immediately. This may involve tightening screws, replacing worn components, or even completely rebuilding the ramp if necessary. Remember, your dog’s safety should always be the top priority.
Additionally, keep an eye on your dog’s usage of the ramp. If you notice that they seem hesitant or uncomfortable using it, consider making adjustments to the incline, surface, or dimensions to better accommodate their needs.
Constructing a DIY dog ramp can be a rewarding and cost-effective way to provide your furry friend with easy access to their favorite spots. However, ensuring the safety and stability of your homemade creation is crucial. By following the steps outlined in this article, you can thoroughly test and maintain your DIY dog ramp, giving your dog the confidence and security they need to navigate their environment with ease.
Conclusion
Crafting a functional and personalized DIY dog ramp for your bed is a rewarding project that can significantly improve your canine companion’s quality of life. By carefully selecting the right materials, following a step-by-step guide, and customizing the design to suit your specific needs, you can create a sturdy and safe platform that enables your furry friend to easily access the bed with confidence. Ensuring the stability and long-term durability of the ramp through proper testing and maintenance is crucial, as your dog’s safety should always be the top priority. With a well-designed and constructed DIY dog ramp, you can provide your beloved pet with the independence and comfort they deserve, while also fostering a stronger bond between you and your four-legged family member. Ultimately, this DIY project is a testament to the love and care you have for your canine companion, and the satisfaction of creating a personalized solution that enhances their daily life is truly priceless.